The Panda Owl

The Panda Owl

Sunday, July 29, 2012

Smitten with Mittens

One of the few clothing items that my parents have kept from my childhood are a pair of salmon pink mittens that were knitted by my paternal grandmother. My grandmother wasn't exactly the cookie baking type, but she scored a domestic home run when she presented the mittens to me (and an identical, smaller pair for my younger sister). I had these special mittens in mind when I embarked on my own mitten making adventure.
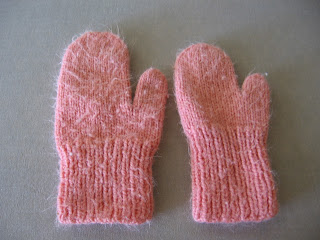
One bigger for the older sis, one smaller for the lil' miss 

Nowadays pretty mittens can be purchased at most clothing stores; I'm sure Gap and JCrew make nice ones with embroidered animals or snowflakes. However, I don't think anything quite matches homemade mittens in terms of coziness and satisfaction. See my results below.

Silver and sparkly!

I'm impressed they turned out looking quite professional (meaning they look like they could be sold in a store), but they are super special because I made them myself (which means they would make great gifts!). I definitely experienced one of those OMG! knitting moment where everything works out well and I was in awe that I crafted something so amazing (I know, I know, I'm tooting my own horn, but I was super excited!).

The only problem was that there were small holes at the point where the thumb joins the body of the mitten. The pattern had asked that I slip 7 stitches onto waste yarn for the thumb and continue knitting the body of the mitten. Then, when the body was completed, go back and pick up 9 stitches around the thumb opening opposite the slipped stitches. I followed these instructions to a T, but it was pretty obvious before I had even finished the thumb that I would have some holes.

One of the holes where thumb and body join is circled 

(1) These were the stitches that were picked up
(2) Hole is formed where the thumb and body join
(3) The stitches underneath the thumb were the stitches saved  on the waste yarn

I have heard of 2 ways to correct this problem. (1) Leave a long tail when picking up stitches. Use the tail to weave around the stitches near the hole and pull to tighten and reduce the size of the hole. (2) Pick up more stitches than necessary around the thumbhole and reduce by the same number of added stitches in the next round. If you forget to reduce, the thumb will be too wide.

I tried Method 1, but unfortunately, since the holes are on opposite sides of the thumbhole, it only worked to close up one of the holes (and not very well at that). Next time I will give Method 2 a try; I will let you know what happens!

Mittens for all!


Monday, July 16, 2012

The Story of the Never-Ending Blanket


Back in October of 2011, I promised my friend I would make him a knitted blanket for his living room. We went to A.C. Moore and found some soft, acrylic-wool blend yarn that worked well with his room's color scheme. I found a simple blanket pattern that would create a checkerboard motif. Off I went, fully intending on getting the blanket done in time for his birthday in December. It's now July of 2012 and I am finally close to finishing! Granted, I've only been working on it sporatically, but I contend that blankets take forever to complete for a couple of reasons.

First, it's easy to fall into the "it could be bigger" trap. Like the guy who is obsessed with finding the absolute largest TV that will still fit into his home media center, I found myself justifying knitting a few inches more. I thought if it was just a few inches longer, my friend could use it as a cover if he falls asleep on the couch. As it stands, the blanket is probably big enough for him and his 2 huskies to huddle under with room to spare!

Second, since blankets are such large projects, when you make a mistake, unraveling and correcting it becomes a herculean task. Try unraveling a few rows of 107 stitches. It's enough to make one pull their hair out and quit. Many a night (including one disasterous incident when I was SO CLOSE to being finished and I dropped a stitch and almost burned the whole thing out of frustration) I just had to stop working and go to bed.

Third, many blankets are knitted on larger needles. The pattern I used called for US Size 17 needles. While this did make the knitting go faster (larger needles ususally create knitted fabric quicker) I found that I had to use bigger hand and arm movements to accommodate the larger needles. This really tired me out (sometimes my shoulders ached after working on the blanket). Maybe I'm doing something wrong, but I probably looked like (and definitely felt like) I was conducting an orchestra.

Even though it took a while, the finished product is quite attractive. And the pattern is a real testament to how little by little, simple stitches can create a textured motif that looks fancy, but isn't too hard to do. Below are a few pictures of the finished product.

The blanket was so large, I had to scrunch it on the bed so it would fit into the picture frame 

Close up to highlight the garter stitch border and the checkerboard texture 

The blanket already has a fan!


Friday, June 29, 2012

The Gift of Knitted Gift Giving, Part 2 (How Did You Do THAT?!)

My grandmother is 80 something, rather independent, and loves to go shopping. Even though she's a pretty cool nana, I don't think she knows what a kerchief is for. Thus, when she is presented with her gift, it's going to be called a scarf and I'm going to have to demo how to wrap it around her neck so that it keeps her warm, but doesn't make her look like Billy the Kid. It turns out that many kerchiefs (and shawls) are started using the garter tab cast-on to create their triangular shape. I was unfamiliar with this knitting technique before this project. This ties into the lesson I learned from working on her gift. You should definitely add to your knitting time if you encounter a technique that you have not used before (i.e. a different cast-on method, a unique stitch pattern, etc). It will probably take you more time than you think to get the hang of it. I had to do some research (reading online tutorials and watching videos) before I figured out how to do the garter tab cast-on properly (FYI – you can do it using a crochet hook or just with regular knitting needles). After completing the garter tab and starting to knit, I also had trouble seeing how the kerchief was forming. I took some photos throughout the project to document my progress and show everyone how the garter tab becomes a triangular piece of knitting.

The garter tab cast-on

Here is a close up of the garter tab cast-on

This is the result after knitting a few more rows 

Slipped knitted piece onto circular needles to accommodate the increasing number of stitches. A kerchief is basically an *isosceles triangle. I can see now that the row attached to the needles is forming to become the two equal sides of the isosceles triangle and the row at the bottom is forming to become the unequal side of the isosceles triangle (the long side of the kerchief).

Finished kerchief. The bound off edge form the two equal (and shorter) sides of the isosceles triangle.

Finished kerchief on me. Gun slinging cowgirl? Or Williamsburg hipster? 

*FYI – An isosceles triangle is a triangle that has two sides that are equal length. The third side can be shorter or longer in length than the two equal sides. In the example of a kerchief, the third side is longer.


Thursday, June 28, 2012

The Gift of Knitted Gift Giving, Part 1 (Easy Does It, Maybe)


Every year sometime in December (and frequently before any major holiday,) countless knitters are faced with the knitting versus time dilemma. Well-imagined plans of knitting homemade gifts do not come to fruition because knitters forget to account for enough time to complete said knitting before designated gift giving occasion. Such miscalculations have surely resulted in the creation of lame construction paper IOUs with promises that physical items will follow at a later date. Or, worst yet, many knitters ditch the knitted gift notion completely and have to brave the masses at the mall to buy last minute gifts.

I found myself in an all too familiar knitting vs time crisis as a family trip to visit my grandparents rapidly approached. I had decided to make some bed slippers for my grandfather and a kerchief for my grandmother. Today's post will focus on the slippers as I learned an important lesson while working on them. Word to the wise – if you have not knitted a particular pattern before, add more time onto your knitting estimate. Do this even if the pattern looks easy! The reasoning is that untried patterns will produce unpredictable results.

For example, you may not be able to obtain the suggested yarn and struggle using the substituted yarn (happened!). Or you may not be pleased with the finished product and want to tweak the design (happened!).

My first attempt at the slippers created something that looked less like a slipper and more like a coffee bean or maybe a canoe (on the bright side, I got some good ideas for knitted bowls).

Can't you see yourself paddling along a river in one of these? 

I wasn't too keen on the back of the slipper - I thought the heel and sole looked too pointy 

I actually ended up running out of yarn (also an unplanned unpleasantry) so I had to go to another yarn store to restock. As I mentioned earlier, I didn't like how the heel of the original slipper was formed so I added a back to the slipper to give it more body.

Picked up stitches on the back end of the slipper and knitted to form a back. I though this gave the slipper a more polished look.

All these tweaks and changes added to my knitting time which fortunately in my case, I could accommodate in my schedule. The second attempt produced slippers that I will gift.

Not the prettiest footwear in the world, but they will keep toes warm

Stay tuned for Part 2 – the kerchief that was supposed to be a shawl that will be described as a neck warmer when gifted to an 85 year old woman.


Thursday, May 24, 2012

See You Later, Alligator!


My husband and I were visiting his aunt who lives in southern Florida. Aunt S heard that I had been doing a ton of knitting and took me to her local yarn store, The Yarn Lady. I was flipping through pattern binders looking for inspiration and came across a scarf that quite literally looked like an alligator. Typically, this would have been a bit kitschy for my taste, but maybe the Florida sun or ridiculously delicious citrus got to my head because I was suddenly gripped by the spirit of Cruella de Vil. Isn't it just hilarious to wear an alligator around your neck? A freaking alligator?!


I probably wouldn't mind finding this little guy in my backyard


Who could say no to a face like this?


The techniques in the pattern weren't complicated, but the scarf did take some time to knit because of the length. Additionally, I made it longer than the suggested length because I wanted to be able to wrap it all the way around my neck. The LYS didn't stock the yarn recommended in the pattern so I used one of my favorites, Cascade 220 Heathers, instead. The slightly variegated yarn color (dark green and golden yellow) along with the bumps really made the scarf oh so “snappy.”


Bumpy, green, and glorious


Yes, I actually wear this in public. And yes, I actually think I look cool ;-)

Tuesday, May 15, 2012

Turning Work When Knitting With Double Pointed Needles (aka The Cookie Monster Mitts Project)

My hands tend to get cold, so I decided to make something cozy and fun to keep them warm. I found a pattern for simple ribbed wristlets and started knitting. Things were going swimmingly until I came across instructions to "turn work and start working back and forth." I was a bit stumped about this – I understood what it meant to "turn work" when using straight needles, but I didn't understand how to apply that to knitting in the round with dpns.

After some needle aerobics and tangled yarn, I finally figured it out. When you reach the end of a round, the working yarn (yarn attached to the ball) is on the needle in your right hand. If you wanted to continue knitting in the round, you would pick up the empty dpn with your right hand (let go of the needle with the working yarn first), use the empty dpn to knit into the first stitch on the needle in your left hand, pulling the working yarn from the needle on your right side around the empty dpn tightly.

When you are instructed to turn your work, you do things differently:

A) Take the needle in your right hand (the needle with the working yarn) and switch it to your left hand.
B) Orient this needle so the working yarn is hanging off the right end of the needle.
C) Place the empty dpn in your right hand.

Stop and think for a moment – doesn't this scenario look and feel familiar? It should because you are basically in the same position when start a new row on straight needles!

D) Use the empty dpn in your right hand to knit into the first stitch on the needle in your left hand, pulling the working yarn from the needle in your left hand around the empty dpn tightly. Continue knitting.

When you get to the end of the round, repeat steps A thru D for as many rounds as the pattern specifies.

When you knit in the round on dpns, you are creating a tube. When you turn your work on dpns, you will be effectively creating a rectangle just like if you were knitting on straight needles. If you knit in the round, then turn your work and knit for a few rounds, then continue knitting in the round, you will create a vertical slit in the tube (perfect, say for a thumb to poke through).


I finished the wristlets and proudly showed them off to my husband, who started laughing and declared that they should be named Cookie Monster Mitts because the color and slight fuzziness of the knitted yarn reminded him of a certain blue, furry cookie-loving monster. I had to agree, but I think in the right context, they look cool and edgy instead of comical. Wouldn't you agree?

C is for Cookie, that's good enough for me! K is for Knitting, as fun as it can be! 

Friday, May 11, 2012

Knitting and Crochet Tools – Do You Remember What You Already Own?


We have all been in this situation before. You unexpectedly run across some used knitting needles at a thrift shop or garage sale. Or, you happen to be at Jo-Ann, Michaels, or your LYS and they are having a mega sale. What a great time to pick up some knitting tools for cheap! Your internal dialogue goes something like this... “I should get some size 6 needles because I don't have any...I think. Or did I not have size 7s? And I know I need size 8 circulars for that cool sweater project, but what length did the pattern call for? 24 inches? 32 inches? Uh...um...oh fiddlesticks!!!”

Once you start knitting in earnest, you typically build up a large collection of needles. Keeping track of them in your head is an impossible task. It's especially frustrating if you are confronted with a fabulous opportunity like one of the scenarios described above, but don't remember what you already own. Fortunately, help is here! Last weekend, I found some cheap used knitting needles at the Alameda Pointe Antiques Faire and Urban Ore. Key to the happy ending in my story was that I had downloaded the Android app Knitting Stash on my phone and used it to document all my knitting needles and crochet hooks. The app allows you to record the sizes (US and metric), type (straight, double pointed, circular), and length of your needles amongst other attributes. All the information is stored on your phone for easy access. There is also functionality to create row counters and record your current projects (haven't used this stuff much yet, but they seem useful). Instead of being stymied, I knew exactly which needles I didn't have and walked away with several pairs to round out my collection for only $2. Not too shabby!

You can read more about the app on Google Play's web page for Knitting Stash. See below for a screen print of the app I got from Google Play.


The solution to knitting needle and crochet hook augmentation anxiety!